
Bulk import your contacts / clients through Xero, Manually or with Zapier
Choose your option to import your contacts:
Xero
Here is a quick guide on how to import your Contacts and Clients through Xero.
When you connect Notud and Xero there is a step by step process on connecting the accounts and Contacts. To view the simple guide click here.
Zapier
Here is a guide to help you bulk import your contacts from a CRM of you choice and keep them updated with Zapier. To view the simple guide click here.
Manually
Here are some quick tips to help you import your contact list from a CSV.
1. Log into Notud
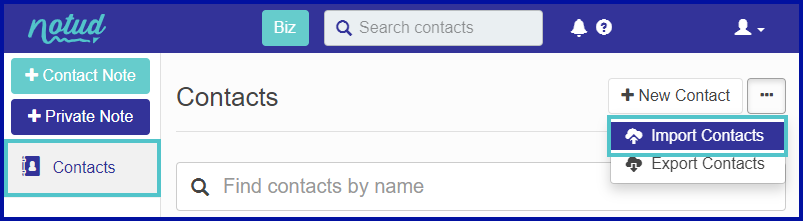
Log in and select Contacts from the side menu then click the three dots in the top right to Import Clients.
2. Create Contact type
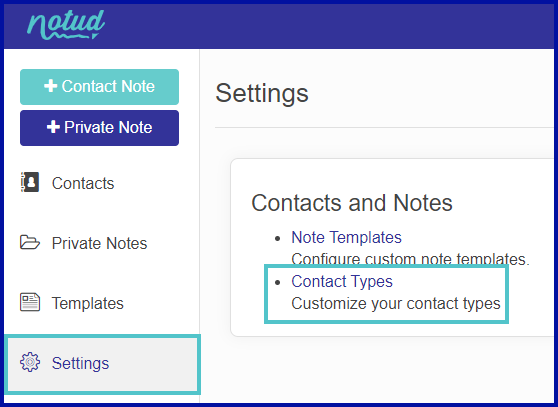
Create a contact type that you can categorize your contacts. Select Settings on the left and click Contact Types.
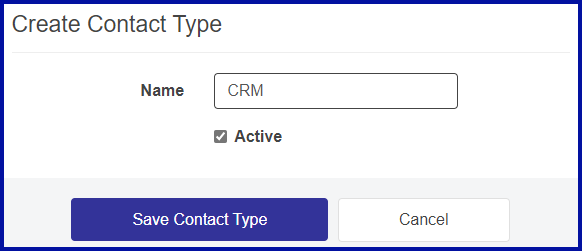
Click New Contact Type and create a new contact type that you can associate with your import contacts.

3. Import Contacts
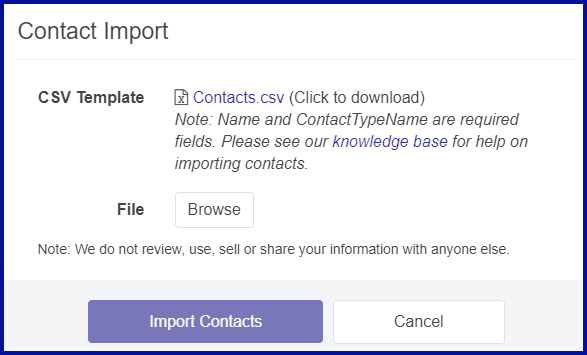
You can upload a CSV (type of excel spreadsheet file) on the clients page. Please note that you’ll have to get it into the correct format for it to import successfully. When you start the import process, you’ll be able to download a template (Contacts.csv) to help format your spreadsheet.
Recommended steps and tips:
-
Download the template: Log in and download the template (see above).
-
Format your list: Once you have the template (Contacts.csv), match up the columns with your client list and make sure that the field headings match.
-
Mandatory fields: Make sure that all mandatory fields are filled in.
- ImportId
- Name
- ContactTypeName
-
ImportId: Having a unique ID for each client is useful. If a few clients don't import due to an error (missing DOB or invalid mobile number) you can fix these issues and re-upload the same CSV file. Notud import will skip clients that have already been imported by matching the ImportId field.
- MobilePhone: Make sure that all mobile phones are formatted correctly for your country or leave blank (too many invalid mobile numbers will stop the import).
-
ContactTypeName: Make sure that all contacts have a contact type associated. You'll also need to create a contact type before you begin import
- BirthDate: If you have a client with a Date of Birth, make sure to format it Year/Month/Day eg 2000/04/25.
-
Import your contact list – Once formatted correctly, log back in and complete the import process.
-
Import result: You'll get a confirmation message upon successful import. Note, you'll get a list of clients that failed to import along with the reason it failed. Use this list to fix up your CSV file and re-import it (remembering that successfully imported clients matching the clientId will be skipped).
NOTE: When working with a CSV file in Microsoft Excel the program drops the leading 0's (Zeros) for phone/mobile numbers because it is a number. IE 0001 will be seen as 1. More information about managing a CSV file in Microsoft Excel can be found here. You can also Google "managing CSV into Excel without losing zeros" if you don't have experience with working with data spreadsheets.
HELP?
We understand uploading or importing clients might be tricky and we’re happy to help. Contact us if you need help importing your clients or if you have any questions.